
Staining hardwood floors represents a significant home improvement project that combines technical skill with artistic vision. This comprehensive guide draws from professional expertise to walk homeowners through the intricate process of transforming their hardwood floors. Learn how to stain hardwood floors and elevate your space with the perfect finish.
Professional Equipment and Preparation
Professional floor refinishing begins with meticulous preparation and the right equipment. Unlike amateur approaches, successful hardwood floor staining requires a comprehensive toolkit and strategic planning.
Essential Equipment
The professional toolkit for hardwood floor staining includes several critical components:
- High-performance floor sander
- Random orbital buffer
- Precision edger or palm sander
- Comprehensive protective gear (safety goggles, ear protection, respiratory mask)
- Multiple grades of sandpaper (60-grit, 80-grit, 100/120-grit)
- Professional-grade wood filler
- High-quality lambswool applicators
- Polyurethane floor sealer
- Mineral spirits for thorough cleaning
Room Preparation
Successful floor staining demands comprehensive room preparation. This involves more than simply moving furniture. Professional refinishers recommend these steps on how to stain hardwood floors properly:
- Complete room clearance
- Sealing air vents to prevent dust circulation
- Covering doorways with protective plastic sheeting
- Removing baseboards and floor-attached moldings
- Conducting a thorough floor inspection for structural integrity
Precision Sanding Technique
Sanding represents the most critical phase of floor preparation. Professionals approach this process with methodical precision, understanding that surface preparation determines the final finish quality.
Sanding Process
The professional sanding approach involves three progressive passes:
1. Initial Pass (60-Grit Sandpaper):
Utilize professional-grade floor sander
Sand in systematic, overlapping rows
Maintain continuous motion to prevent uneven surfaces
Focus on removing existing finish and surface imperfections
2. Intermediate Pass (80-Grit Sandpaper):
Smooth initial sanding marks
Prepare surface for fine finishing
Maintain consistent pressure and movement
3. Final Pass (100/120-Grit Sandpaper):
Achieve exceptionally smooth surface
Prepare floor for stain absorption
For corners and hard-to-reach areas, professionals use palm sanders or detail tools. Wood filler addresses any surface imperfections, ensuring a uniform finish.
Stain Application Mastery
Selecting and applying wood stain is an art form that requires a delicate balance of technical precision and aesthetic understanding. Professionals know exactly how to stain hardwood floors to achieve the desired look.
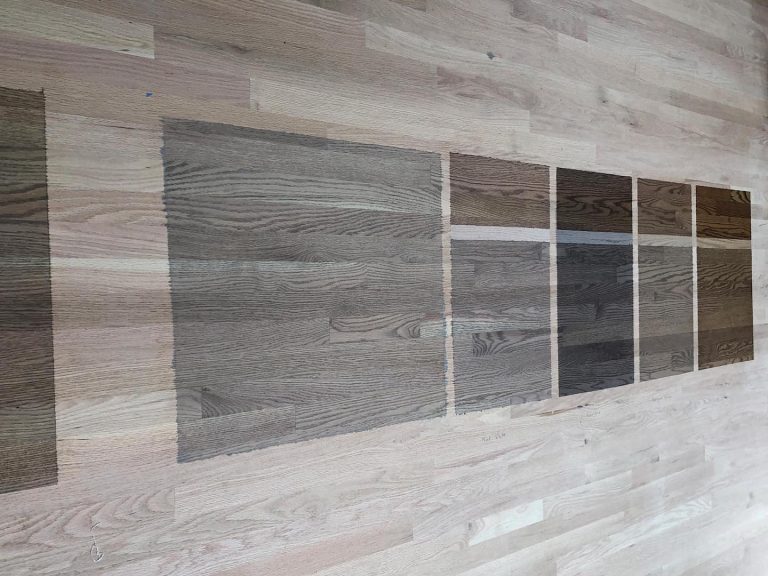
Stain Selection Considerations:
- Wood species and existing coloration
- Desired color intensity
- Interior design complementarity
- Performance characteristics of water-based versus oil-based stains
The journey of stain selection begins with a deep understanding of the wood’s inherent characteristics. Each wood species responds differently to staining, with factors like grain pattern, density, and natural color playing crucial roles in the final appearance. A professional will carefully evaluate the existing wood coloration, considering how different stain types will interact with the natural wood tones.
Water-based and oil-based stains offer distinct advantages. Water-based stains provide quick drying times and easier cleanup, with less pronounced odor. They work particularly well on lighter woods and offer more consistent color application. Oil-based stains, by contrast, penetrate more deeply, creating richer, more nuanced color profiles that highlight the wood’s natural grain and texture.
Application Methodology
- Begin at the room’s farthest corner
- Work systematically towards the exit
- Apply stain in controlled, two-foot sections
- Use lambswool applicators for consistent coverage
- Apply multiple thin coats for depth and evenness
- Allow adequate drying between applications
The application process is where true craftsmanship comes into play. Professionals approach staining with a strategic mindset, moving systematically across the floor to ensure complete and consistent coverage. The use of lambswool applicators is not arbitrary – these tools provide unparalleled even distribution, preventing streaks, pools, and uneven coloration that can mar the final finish.
Multiple thin coats are preferred over a single thick application. This approach allows for greater control, enabling the refinisher to build depth and richness of color gradually. Each coat is allowed to dry completely, with careful inspection between applications to ensure the desired aesthetic is achieved.
Protective Sealing
Polyurethane sealing is the final guardian of your newly refinished floor, protecting the beautiful stain work from daily wear and environmental challenges. This protective layer is more than just a finishing touch – it’s a critical component that ensures the longevity and durability of the floor.
Sealing Technique:
- Use high-density foam rollers for even application
- Apply thin, uniform coats
- Use precision brushes for edges and tight spaces
- Follow manufacturer-recommended drying times
- Consider light sanding between coats for optimal adhesion
The sealing process demands the same meticulous attention to detail as the staining itself. High-density foam rollers create a smooth, even application, while precision brushes ensure complete coverage in hard-to-reach areas. Professionals understand that the quality of the seal directly impacts the floor’s resistance to scratches, moisture, and daily wear.
Post-Application Considerations
Caring for your floors after refinishing is just as important as the refinishing process itself. Proper precautions ensure the finish sets correctly and provides long-lasting results. These are the key considerations to keep in mind during the final stages of your floor refinishing project:
- Minimum 24-hour walking restriction
- 72-hour furniture replacement waiting period
- Gradual return to normal floor usage
Patience is crucial in the final stages of floor refinishing. The 24-hour walking restriction and 72-hour furniture moratorium may seem inconvenient, but they are essential for allowing the finish to cure properly. Rushing this process can compromise the entire refinishing project.
Cost and Time Investment
Understanding the financial and time commitment upfront helps in planning a successful refinishing project. A clear budget and schedule ensure the process runs smoothly. Here’s an overview of the costs and time involved in the refinishing process:
- Budget Range: $500 — $1,500
- Time Investment: 2-3 full working days
- Skill Level: Intermediate to Advanced
While the project requires a significant time and financial investment, the results can dramatically transform a living space. Professional-quality refinishing adds value to your home and can restore floors that might otherwise seem beyond repair.
When to Seek Professional Assistance
Sometimes, professional expertise is the key to achieving flawless refinishing results. Knowing when to call an expert can save time, effort, and potential mistakes. If any of the following apply, it’s best to consult with a professional:
- Significant floor structural damage exists
- Specialized equipment is unavailable
- Technical complexity seems overwhelming
- Time constraints limit personal project completion
If you’re unsure about how to stain hardwood floors yourself, seeking professional help ensures that the process is done correctly and without any unexpected challenges. A professional can also provide guidance if you’re unsure about the type of stain to use or how to properly apply it.
Final Thoughts
Hardwood floor staining is a nuanced process that blends technical skill with artistic vision. By understanding the intricate details of wood treatment and approaching the project with patience and precision, homeowners can transform their living spaces, creating floors that are both beautiful and durable. Now that you know how to stain hardwood floors, you’re equipped to begin your floor transformation with confidence.