
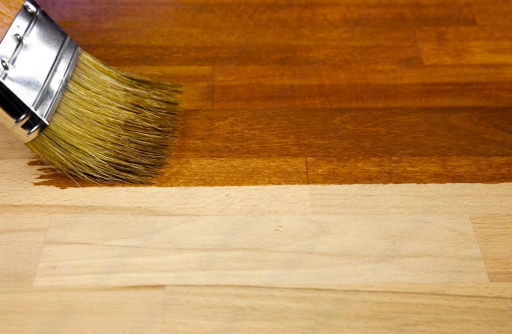
Hardwood floor stains are the colorants that soak into the wood grain and shape how the floor looks and feels. You use stain when the natural wood is too red, too yellow, too dull, or simply doesn’t fit your style. Light tones brighten, medium browns stay classic, dark espresso adds depth, and grey or greige create a modern, calm vibe.
Stain helps you make a noticeable change without replacing the floor. It evens out mismatched boards, modernizes older finishes, tones down red oak’s warmth, and refreshes solid hardwood and most engineered hardwood flooring. Application is usually straightforward – wipe on, wipe off – though the final look still depends on the wood, lighting, and the protective finish you put on top. Oil-based stains feel warm and slow, water-based stains feel thin and quick, gel stains sit more on the surface, and penetrating oils soak in with that soft, natural vibe. Each type reacts a little differently once it touches real wood.
After 15+ years of doing this at 1 DAY® Refinishing, I’d say stain is less about “painting the floor” and more about guiding the wood into the look you want. You crack open the can, get that faint smoky smell from the pigments, and the grain starts showing its personality the moment stain hits it. That’s where the process really starts.
Now let’s talk about how stains work and how to pick the right one for your home.
How Stains Work on Wood
Stains soak into pores. That’s the basic science. According to the USDA Wood Handbook, absorption depends on grain structure, density, and tannin content. But reading about it and watching it happen are two different things.
Red oak pulls stain into its open grain almost greedily. Maple? Maple pretends to be smooth but then absorbs unevenly and surprises you with blotchiness. That’s why sample testing isn’t optional. You test because wood has moods, and stains reveal them fast.
Stain vs. Finish: Key Differences
Some homeowners mix up the terms stain and finish, and that’s okay – not everyone lives in this world. Here’s the quick version:
Stain = color
Finish = protection
Stain creates the tone, undertone, and depth. Finish gives you sheen and durability. A good satin water-based polyurethane protects the color without warming it much. Oil poly adds that amber tone that some people love and others don’t.
If you want a simple guide on finishes themselves, you can peek at our hardwood floor refinishing overview.
When You Should and Shouldn’t Stain Hardwood Floors
You should stain when:
- you want a big color change
- you’re modernizing old ambered floors
- you’re matching new boards to old ones
- your interior style leans warm, cool, or greige and natural wood doesn’t fit
You shouldn’t stain when:
- you have maple or birch but don’t want to deal with prep
- the room gets intense daily sunlight
- you’re chasing the raw-wood Scandinavian vibe but want a zero-maintenance floor
- you love walnut as-is (seriously, don’t stain walnut unless there’s a specific goal)
Some floors look best with nothing more than a clean, water-based finish.
Types of Hardwood Floor Stains
People see dozens of stain cans at the store. In real life, contractors mostly work with four families.
Oil-Based Hardwood Floor Stains
Oil-based stains are the old-school workhorse. When you first stir them, that dense smell hits – familiar to anyone who’s ever spent a day staining floors. They spread smoothly and give deep, rich color.
- Pros: long open time (great for even wiping), strong pigmentation, classic warm tones.
- Cons: higher VOCs, slower drying, shift warmer under oil-based polyurethane.
The EPA notes that levels of many VOCs indoors – arising from paints, varnishes, stains, and other coatings – can be several times higher than outdoors, and recommends increasing ventilation when using such products.
Water-Based Hardwood Floor Stains
Water-based stains dry fast and smell less. They run thinner – you can feel it when you wipe. They keep color closer to the wet sample, making them great for modern neutrals.
- Pros: low VOC, fast turnaround, predictable color.
- Cons: shorter working time, sometimes cooler-looking, can raise grain slightly.
On our projects, we often use Bona Chroma water-based stains. They dry quickly, have minimal odor, and feature a non-yellowing formula, which helps keep the color stable over time.
Gel Stains & Penetrating Oils
Gel stains sit more on top than they soak in, which is why they work beautifully on woods that like to misbehave (looking at you, pine and maple). Penetrating oils soak in deeper but leave a natural, velvety feel underfoot.
Gel stains help reduce blotching. Penetrating oils bring warmth and keep the grain feel alive. We use them when traditional stains just don’t cooperate.
Custom-Mixed Stains
Sometimes the color card is close… but not close enough. Maybe there’s too much red. Maybe the grey has too much blue under LED lights. That’s where custom mixing comes in.
At 1 DAY® Refinishing our refinishers mix combinations like:
- brown plus a touch of neutral black
- greige plus natural
- two medium browns to mute red oak’s pink cast
- layered combinations for depth
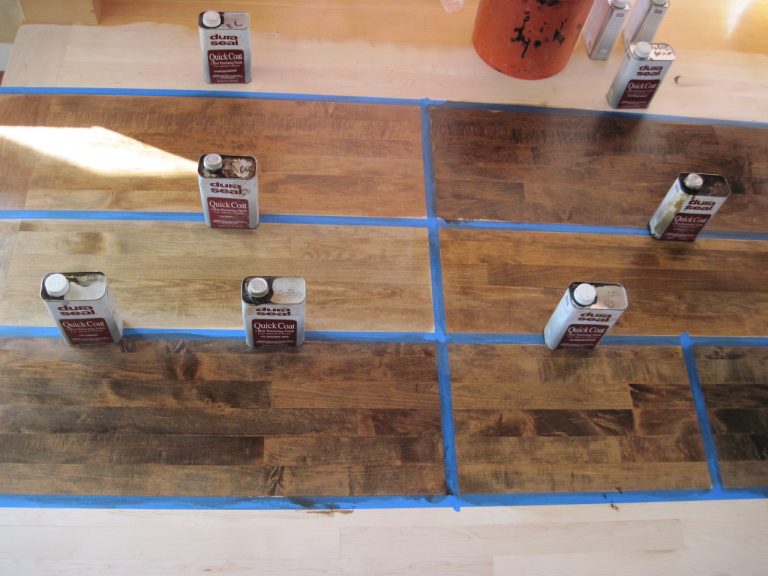
Color charts don’t tell the whole story. The actual boards do. That’s why test patches matter more than any brochure.
Popular Hardwood Floor Stain Colors
Trends come and go, but wood has its own way of reacting to color. These are the stain families we see most often.
Light & Natural Stain Colors
Light stains give a clean, airy feeling. They hide dust surprisingly well and brighten dark hallways. They’re perfect for Scandinavian-inspired spaces or homes with lots of natural light.
Colors in this family include: natural, soft beige, pale honey, desaturated naturals, and almost raw-wood looks.
Medium Browns
Medium browns are crowd-pleasers. Warm but not too warm. Brown but not too heavy. They fit almost any décor style and work great on red oak, white oak, and hickory.
They age well, hide small scratches, and make the home feel grounded.
Dark Brown & Espresso Tones
Dark stains bring drama. They highlight grain contrast and look excellent in big, open rooms with strong natural light. But – and here’s where people sometimes get surprised – they show dust, pet hair, and footprints faster than lighter tones.
Still, nothing beats a deep espresso on wide-plank oak. It’s timeless.
Grey, Greige & Whitewash Stains
These modern tones are still trending. Greys are crisp and cool. Greige softens the look with a hint of warmth. Whitewash brightens small rooms and works beautifully on white oak.
Whitewash + white oak = that Pinterest-perfect Scandinavian feel.
How Wood Species Affect Hardwood Floor Stains
You don’t stain every species the same way. Wood species arguably matter as much as the stain color itself.
Red Oak
Red oak loves stain – maybe too much. It pulls warm. That “red shift” is real. Even brown stains can pick up a little red. Water popping deepens the tone and helps mute pink undertones.
With the right prep, you can get gorgeous browns and greiges on red oak.
White Oak
White oak is one of the most flexible species to stain. The Forest Products Laboratory notes its strong tannin content, which reacts well with most stain types.
You can achieve:
- soft naturals
- muted greys
- modern desaturated tones
- deep browns without heavy warmth
It’s the designer’s favorite for a reason.
Maple
Maple looks smooth but absorbs unevenly, leading to blotching. It’s closed-grain, so stain doesn’t settle easily.
Solutions we use:
- pre-stain conditioner
- gel stain
- water popping
- multiple test patches
When done right, maple looks incredibly refined.
Hickory
Hickory has big color variation between boards. Stain exaggerates that contrast. Some people love that rustic character – others find it too busy.
Medium browns help unify the look while keeping hickory’s natural charm.
Walnut
Walnut is naturally dark and rich. Most homeowners skip stain altogether. If stained, walnut goes even deeper into chocolate territory. Under certain lights, walnut takes on a warm glow that you can’t force out of other species.
Pine and Other Softwoods
Pine absorbs stain unevenly and can turn blotchy fast. Gel stains, conditioners, and slow-drying stain bases are essential. Softwoods require patience, but with the right prep they deliver a warm, cozy look.
How to Choose the Right Hardwood Floor Stain
Picking a stain is part art, part science, part intuition, and part “how does the room feel to you?”
Matching Stain to Interior Style
Here’s a quick table we use to help homeowners narrow down options:
| Interior Style | Best Stain Families | Notes |
|---|---|---|
| Modern / Minimal | Natural, grey, desaturated | White oak shines here |
| Farmhouse | Warm naturals, medium browns | Soft, relaxed feel |
| Traditional | Rich browns | Matches classic trim |
| Coastal | Whitewash, pale beige | Bright and open |
| Industrial | Espresso, charcoal, greige | Bold contrast |
Not rules – just jumping-off points.
Understanding Natural Wood Undertones
Every wood has undertones. That’s where most homeowners trip up choosing stains.
Red oak is warm.
Maple is creamy.
White oak is neutral.
Walnut is dark chocolate.
Stains mix with undertones, not over them. Get a mismatch and the color drifts into green, red, or muddy territory.
Lighting & Room Size Influence on Color
Lighting changes a stain constantly throughout the day. Cool LEDs push greige into blue. Afternoon sunlight warms grey into beige. Small rooms feel bigger with lighter tones.
Always check stain samples:
- in morning light
- in afternoon sun
- in evening artificial light
Trust your eyes, not the brochure.
Pets, Kids & High-Traffic Considerations
If your home sees a lot of activity, stain color matters.
Dark stains = show everything
Light and medium stains = hide more life
Check out our hardwood floor maintenance guide if you want the simplest upkeep routine.
Best Hardwood Floor Stains by Room Type
Different rooms behave differently. Light moves differently, moisture shifts, foot traffic changes. So stain choice isn’t just “what looks nice” – it’s “what works here.”
Living Room & Open Concept
Living rooms usually get the best mix of natural light and breathing room. That’s why almost any stain family works here. Light stains make the space feel bigger and calmer. Medium browns bring warmth without making the room heavy. Even darker browns can shine if the windows are generous.
And because these spaces usually have the most furniture, medium tones tend to feel the most balanced. They kind of anchor the whole vibe.
Bedrooms & Nursery
You want calm energy in bedrooms – something that feels settled even when the room is half-lit at night. Soft naturals, honey tones, and light beige stains are great for that. They add warmth without overpowering everything else.
Nurseries especially benefit from these softer looks. Light stains bounce light around and keep the space feeling gentle and cozy – and that matters at 3 A.M. when you’re pacing with a baby.
Kitchen
Kitchens deal with everything: spills, steam, shifting humidity, warm lights overhead. So you want something stable – a stain that doesn’t shift too much under yellow-toned bulbs and a finish that doesn’t amber aggressively.
Medium browns and naturals usually perform best here. They forgive minor scuffs and hide crumbs a little better than dark tones. And always, always check your test patches under your actual kitchen lighting – LEDs and halogens can really change undertones.
Hallways & Entryways
These zones get hammered – boots, pet paws, dirt, sand, you name it. Dark stains look beautiful on day one but show traffic way too fast in entryways. That’s why we lean toward medium tones or warm naturals here.
Hallways also connect multiple rooms, so a mid-tone stain often helps everything feel unified. You’d be amazed how much smoother a house feels when the hallway isn’t fighting the other colors.
Basement
Basements are tricky. They’re darker, cooler, and often more humid than the rest of the home. Light stains help open the space visually. Medium tones also work if you want a cozier feeling, but dark stains usually make basements feel heavy.
Water-based systems often hold up better in basement humidity. They keep the color stable and dry faster in lower-light areas. Many homeowners are honestly shocked at how much better their basement feels after going lighter.
Common Hardwood Floor Staining Problems
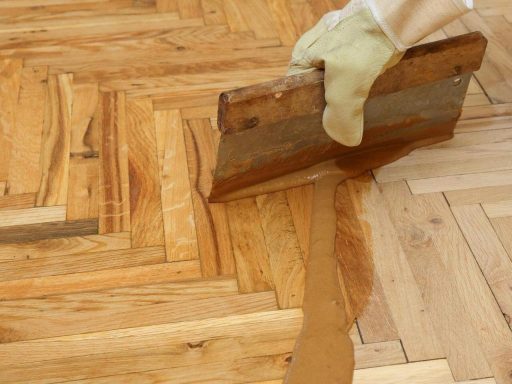
Staining isn’t tough because the stain is complicated. It’s tough because wood is complicated. The surface has to be prepped right or everything that happens next becomes unpredictable.
Blotchy or Uneven Absorption
This is the number-one issue we see when homeowners try DIY staining. Blotching happens when the wood absorbs stain unevenly. Maple, birch, and pine are the worst for this, but it can happen to any species if the sanding hardwood floors the right way – from prep to perfect finish – wasn’t done consistently.
Blotching usually comes from:
- skipping pre-conditioner
- using uneven sanding grits
- wiping stain at inconsistent times
- applying stain too thick
The NWFA (2023) guidelines emphasize consistent sanding, and they’re right. A clean, even surface makes all the difference.
Stain Color Shifting Red/Yellow/Green
Undertones are sneaky. They show up once the stain hits the wood or once the light hits the stain. Red oak might push your grey stain slightly warm. Cool LEDs might turn your greige a bit blue. Natural sunlight can soften even the strongest tones.
Always test stain samples in different lighting. Not up close – stand back. Undertones reveal themselves from across the room.
Maple Not Taking Stain Properly
Maple is famous for this problem. It looks smooth and innocent, then boom – blotches everywhere. Its closed grain makes absorption uneven unless you treat it carefully.
Our typical approach at 1 DAY® Refinishing:
- apply a pre-stain conditioner
- use gel stain or a slower-drying base
- water-pop the floor
- test, adjust, retest
When done well, maple looks incredibly refined and almost silky.
Color Changing After Polyurethane or Hardwax Oil
This one surprises people. The floor looks perfect after stain – exactly the color they wanted – then the finish coat goes on and everything shifts. Totally normal.
Here’s the typical pattern:
| Finish Type | Color Shift | Notes |
|---|---|---|
| Oil Poly | Warm amber | Richens browns |
| Water Poly | Minimal shift | Great for natural looks |
| Hardwax Oil | Slight warmth | Very natural underfoot |
Oil poly warms up everything. Water-based poly keeps things as close to the sample as you can get. Hardwax oil gives a soft, natural feel with just a hint of warmth. If you expect the shift, it feels good. If you don’t, that’s when homeowners panic.
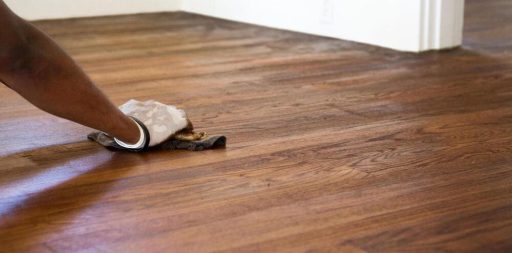
Choosing the Best Hardwood Floor Stain for Your Home
So… how do you actually choose the right hardwood floor stain? Honestly, the right stain is the one that makes your home feel the way you want it to. Sure, species, undertones, sunlight, and finish type all matter. But when you see the color on your boards – in your light, in your space – you’ll know.
At 1 DAY® Refinishing, our pros take stain testing seriously. We look at samples in morning light, warm evening light, overhead LEDs – all of it. Because stains don’t live in color charts. They live in real rooms with shadows and windows and furniture and life happening around them.
Take your time with stain samples. Look at them from across the room. Look at them next to your cabinets and your rug. And if the stain behaves weird, we’ve seen that before, and we’ll help you figure it out. If you ever want a hand choosing, matching, or testing hardwood floor stains, our refinishers are always ready to help.