
When you embark on the journey of sanding hardwood floors, it’s essential to understand the dust challenge that comes with it. Sanding creates fine particles that can spread throughout your home, settling on surfaces and infiltrating your indoor air. This dust is not just an aesthetic issue; it poses several health risks and can complicate the refinishing process. By acknowledging the potential mess upfront, you can take proactive steps to mitigate its impact.
The particles generated during sanding are predominantly composed of wood dust, which can be extremely fine. These tiny particles can remain airborne for an extended period, making them difficult to control. The dust can cling to walls, furniture, and even your lungs if inhaled. This is why understanding the nature of the dust created from sanding hardwood floors is crucial to prepare adequately for the task at hand.
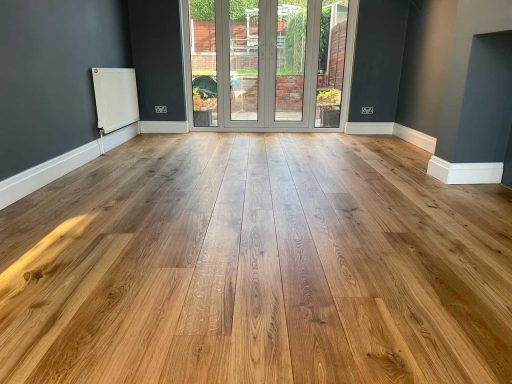
Dust can adversely affect the quality of your finish. If dust settles on your freshly sanded surface before applying a coat of varnish or stain, it can lead to an uneven surface and a less than desirable final appearance. Therefore, having a solid plan to handle dust is integral to achieving a high-quality finish that enhances the beauty of your hardwood floors.
Health Risks Associated with Sanding Dust
Sanding hardwood floors can lead to various health risks, particularly if proper precautions are not taken. One of the most concerning issues is the inhalation of fine wood dust, which can irritate the respiratory system. Prolonged exposure can lead to more severe health problems, including chronic respiratory diseases, allergies, and even asthma. It is essential to recognize these risks to prioritize your safety during the sanding process.
Additionally, some types of wood can release harmful substances when sanded. For instance, exotic woods may contain toxins that can cause skin irritation or allergic reactions. The dust from these woods can be especially hazardous, as it not only affects your lungs but potentially impacts your skin and eyes as well. Taking the time to understand the specifics of the wood you are working with will enable you to take the necessary precautions.
To mitigate these risks, adopting good practices is vital. This includes wearing appropriate protective gear and ensuring proper ventilation during the sanding process. Moreover, being aware of symptoms related to dust exposure can help you manage any issues early. If you begin to experience respiratory difficulties, skin irritation, or other health concerns, it may be time to pause and reassess your approach to sanding hardwood floors.
Essential Protective Gear for Sanding Hardwood Floors
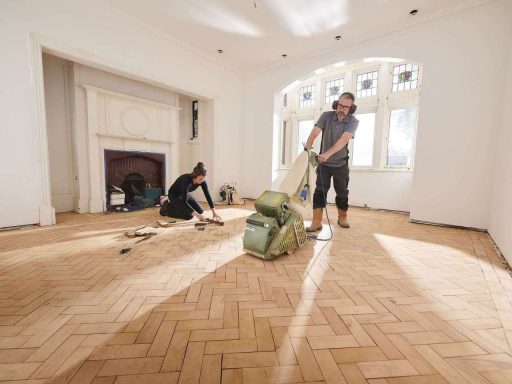
Equipping yourself with the right protective gear is paramount when sanding hardwood floors. The first and most crucial item is a high-quality respirator. Unlike standard masks, respirators filter out harmful particles and ensure that you breathe cleaner air during the sanding process. Make sure to select a respirator rated for fine dust and confirm that it fits correctly to maximize its effectiveness.
Equipping yourself with the right protective gear is paramount when sanding hardwood floors. The first and most crucial item is a high-quality respirator. Unlike standard masks, respirators filter out harmful particles, including dust from sanding hardwood floors, and ensure that you breathe cleaner air during the sanding process. Make sure to select a respirator rated for fine dust and confirm that it fits correctly to maximize its effectiveness.
Lastly, wearing gloves and protective clothing is essential. This will not only protect your skin from irritation caused by dust but also from any chemicals or finishes you may use later in the project. Opt for clothing made from breathable materials that cover your arms and legs. By investing in the right protective gear, you can significantly reduce your exposure to the health risks associated with sanding hardwood floors.
Preparing Your Space: Dust Containment Strategies
Before you begin sanding, preparing your space with effective dust containment strategies is crucial. Start by clearing the area of furniture, rugs, and any other items that may collect dust. If it’s not possible to remove everything, cover these items with plastic sheeting to protect them from dust accumulation. This simple step can save you from extensive cleanup later.
Creating physical barriers is another effective strategy. Use painter’s tape and plastic sheeting to seal off doorways and vents, limiting the spread of dust to other areas of your home. This is particularly important if you are sanding in a multi-room space. You may also consider using air purifiers equipped with HEPA filters to capture airborne particles. Placing them in the work area can significantly improve air quality and reduce dust exposure.
Finally, maintaining good airflow is essential. Open windows and doors to facilitate cross-ventilation, which can help disperse dust particles. However, be cautious if outdoor conditions are dusty or windy, as this may counteract your efforts. Balancing containment with ventilation will create a safer workspace and make the sanding process more efficient.
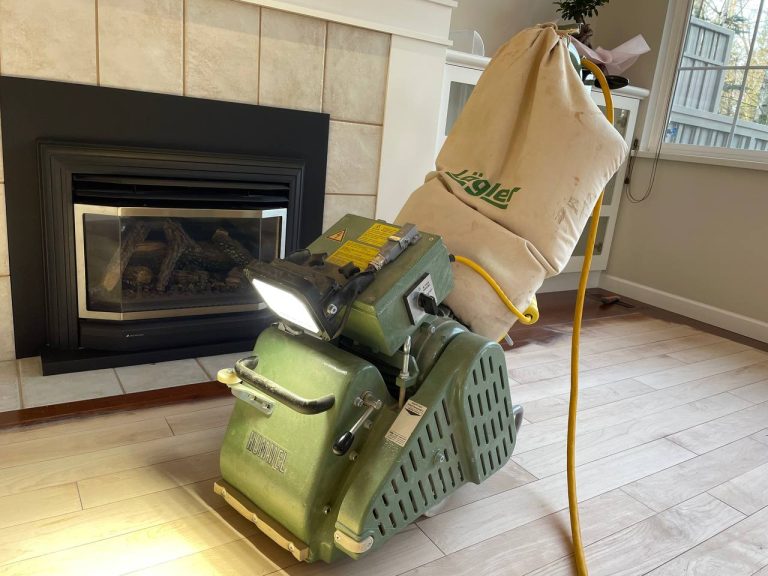
Top Dust Collection Systems for Hardwood Floor Sanding
Investing in a good dust collection system will enhance your sanding experience while reducing the amount of dust generated. Various systems are available, and understanding how they work can help you choose the right fit for your project. Here are some top options to consider:
- Shop Vacuums: These powerful vacuums can be equipped with specialized filters that capture fine dust. Ensure that the vacuum has a HEPA filter for optimal dust collection. Many shop vacuums can be connected directly to sanders, capturing dust at the source.
- Dust Extractors: Designed specifically for use with power tools, dust extractors are more efficient than standard shop vacuums. They automatically turn on when you power up your sander, making them convenient for continuous use. Look for models with variable suction power to adjust based on your needs.
- Bagged Systems: Some dust collection systems use bags to capture dust. These systems are often quieter and easier to maintain than bagless options. Choose a bag designed to capture fine dust to ensure maximum filtration.
- Cyclone Separators: These devices can be attached to your vacuum system to improve dust collection efficiency. They use centrifugal force to separate larger particles before they reach the vacuum, preventing clogging and maintaining suction power.
Selecting a suitable dust collection system will not only help keep your workspace clean but also contribute to a healthier environment for you and your family. By minimizing dust exposure, you can focus on achieving a flawless finish for your hardwood floors.
Innovative Dustless Sanding Technologies
The evolution of sanding technologies has led to the introduction of innovative dustless sanding systems. These tools are designed to minimize dust while maximizing efficiency, allowing you to achieve professional results with less hassle. Here are some of the most notable advancements in dustless sanding:
- Self-Contained Sanding Machines: Many modern sanders are equipped with built-in dust collection systems. These machines are designed to capture dust at the source, reducing the amount of fine particles released into the air. They offer a seamless sanding experience, enabling you to focus on the finish rather than the cleanup.
- HEPA Filtration Systems: Some sanding machines now come with HEPA filtration systems that can trap 99.97% of particles, including those as small as 0.3 microns. This level of filtration ensures that the air remains cleaner, making it safer for you and your family during and after the sanding process.
- Variable Speed Controls: Advanced sanding machines often feature variable speed controls, allowing you to adjust the power based on the task at hand. Lower speeds can help reduce dust generation during the initial sanding, while higher speeds can be used for final touches. This flexibility allows for greater control over the sanding process.
- Integrated Dust Hoses: Many new sanders come with integrated dust hoses that connect directly to a vacuum system. This eliminates the need for additional attachments and ensures a more efficient dust collection process.
Post-Sanding Cleanup: Effective Dust Removal Techniques
After sanding your hardwood floors, thorough cleanup is essential to eliminate any remaining dust. This process will not only improve the air quality in your home but also prepare the surface for finishing. Here are some effective dust removal techniques to consider:
- Vacuuming: Start by vacuuming the entire area using a shop vacuum or dust extractor with a HEPA filter. This will remove the majority of the dust particles that have settled on the floor and surrounding surfaces. Make sure to use attachments designed for hardwood floors to prevent scratching.
- Damp Mopping: After vacuuming, damp mopping is an excellent way to capture any lingering dust. Use a microfiber mop that can trap fine particles effectively. Avoid using excessive water, as this can damage the wood. Instead, lightly dampen the mop to pick up dust without saturating the floor.
- Wiping Surfaces: Don’t forget to wipe down surfaces such as baseboards, window sills, and furniture in the vicinity. Use a damp cloth or microfiber cloth to capture dust particles that may have settled during the sanding process. This ensures that every corner of your space is clean and dust-free.
- Air Purification: Consider running an air purifier with a HEPA filter in the area for several hours following cleanup. This can help capture any remaining airborne particles and improve indoor air quality. Be sure to change the filter regularly to maintain optimal performance.
Maintaining Indoor Air Quality During and After Sanding
Maintaining indoor air quality is vital during and after sanding hardwood floors. The dust from sanding hardwood floors generated can linger in the air, affecting not only your health but also the overall atmosphere of your home. Here are some strategies to ensure good air quality throughout the sanding process:
- Ventilation: As mentioned earlier, proper ventilation is crucial. Open windows and doors to create a flow of fresh air. If weather conditions allow, consider using exhaust fans to help expel dust from the workspace. Proper airflow will help dilute the concentration of airborne particles.
- Air Filtration: Utilizing air purifiers with HEPA filters can significantly improve air quality. Place these devices strategically throughout your home, particularly in the areas adjacent to your sanding project. Run them continuously during the sanding process and for several hours afterward to capture any residual dust.
- Regular Breaks: Take frequent breaks during sanding to step outside and breathe fresh air. This will not only help clear your lungs but also give you a moment to assess your workspace. Use this time to check your protective gear and make any adjustments as needed.
- Post-Sanding Monitoring: After you finish sanding, monitor your indoor air quality by checking for any lingering dust or odors. If you notice any issues, running air purifiers and ensuring ongoing ventilation will be beneficial. Additionally, avoiding activities that generate dust, such as vacuuming or cooking, can help maintain air quality.
By prioritizing indoor air quality, you can create a healthier environment for yourself and your family during the hardwood floor sanding process.
Summary
Dealing with dust from sanding hardwood floors is an essential part of the refinishing process. By understanding the dust challenge and the associated health risks, you can take proactive measures to protect yourself and your home. Equipping yourself with essential protective gear and implementing effective dust containment strategies will significantly improve your sanding experience. Investing in top dust collection systems and utilizing innovative dustless sanding technologies can further enhance your work by minimizing dust generation. Effective post-sanding cleanup and maintaining indoor air quality will ensure your home remains a safe and healthy space.